Sunday, June 19, 2011

Holding Down Bent Strips

I decided not to use staples on the deck of the boat. This means that strips have to be held into place with something else when they are glued into place. I'm using a dab of hot glue where the strips meet the forms. Hot glue isn't as strong as a staple, so in difficult situations other means are necessary.

The ends of the Guillemot are upswept. This means the strips that go out to the ends have to bend up and stay bent up while they are glued into place and afterwards. The first step to getting them into shape is to steam them and bend them. After that, they need to be held firmly into place so they don't lose their shape. Simple clamps are not strong enough, or easy enough to put into place to do this. So, another way is needed: the temporary screw-in clamp.

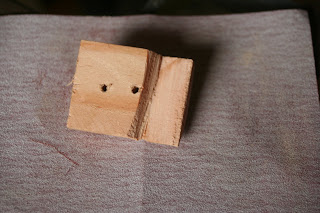
A notch is cut into a small piece of scrap wood:


The wood clamp is placed where needed, a hole is drilled, and a screw holds it into place:

In the example above and below, a small wedge of cedar was used to tighten the strip in place.


View of two of these clamps from the upswept stern end of the kayak. The very end is held in place with masking tape.

Fixing the Sheer Strip for the Deck

The sheer runs along the full length of the kayak at the widest part of the kayak. It is where the hull meets the deck and where the two halves of the kayak are joined together after the hull and deck are completed.

On the deck, I'm using a half inch tiger maple for the sheer strip. The strip is off a 10 foot board, so I had to attach two strips end to end. I attempted to do this with a butt joint, i.e. two flat ends glued together. The joint didn't hold and I ended up with a gap:


My choices were either to pull the sheer strip off the boat or to repair it in place. Repair it in place it was. I decided to cut out about a foot long portion of the sheer. I cut it at an angle to do a scarf joint. To insure that the scarf on the patch strip would match that on the patch strip, I taped them together before cutting. I also used a thin sheet of steel with a thin piece of wood taped to make sure I didn't saw through to the hull. This shows the set-up after I made the cut through the sheer strip and the patch strip:


I cut the patch strip a little longer than it needed to be and then sanded the end to shorten it. I was careful to make sure the scarf angle stayed the same. Here it is just before gluing. Note the tape on the hull to make sure the glue from the patch didn't glue the deck sheer strip to the hull:


Sunday, June 05, 2011

Fairing and Sanding the Hull

After stripping the hull, it was time to fair (make the surface regular) and sand. In concept its pretty simple -- make the hull shaped like it is supposed to be shaped, and make it smooth. In practice, its not rocket science either.

The steps:
  1. Use a cabinet scraper to scrape all the glue blotches off.
  2. Use a plane and a cabinet scraper to pare down the prominent ridges where strips meet. (be careful, planing can be mesmerizing and you don't want to go through the hull!)
  3. Use a fairing board, which is nothing more than sandpaper glued onto a plywood board with handles, to fair the surface.
  4. Use sandpaper wrapped around spongy foam to fair and smooth concave areas.
  5. Wet out and sand smooth again. This is the time to search for glue spots that escaped the fairing and sanding so that they don't make an ugly appearance when it is too late to do anything about it (i.e. after epoxy and fiberglass).
One big lesson I learned on this is to use good sandpaper. I used cheap sandpaper for most of the fairing and it took me two or three times as long as it would have with the good stuff.

For the sanding, I used a random orbital sander. This power tool is now one of my best friends. I got one that I could hook a vacuum to and it reduced the dust by about 95%.

BE SURE TO WEAR A DUST MASK!

A few photos to show off my astounding work:

This is the fairing board I made. The handles are angled on purpose, as I find my wrists get sore if I use handles that are vertical. The board is the size of 1/2 sheet of sandpaper, which can be glued on with spray adhesive. Ideally, the fairing board will flex so that it rounds the shape of the boat. I will use thinner plywood next time so that the board flexes.

Looking at the hull from the stern. One half is wetted out to raise the grain, the other half isn't. Can you guess which is which? I thought you could. (In case you couldn't, the right side is wetted out.)


Most of the hull viewed from the bow. The book matching shows up really well here. The board I used for strips had more sapwood (light) at one end and more heartwood (dark) at the other. I laid the strips so that the bow would be lighter and the stern darker. That shows up a little in this picture. I'm hoping it is apparent when the boat is complete.


Detail of the bow. If you look close, you can see that not only did I book match the strips centered around the keel line (see photos above) but also between pairs of strips on one side. The effect is subtle, but I hope it is apparent when the boat is finished.


Monday, May 30, 2011

Yet More Repairs

In an ideal world, inexpensive cedar boards are knot and damage free and I am rich and good looking. One look at my bank balance, my face, or an inexpensive piece of cedar will tell you it is not an ideal world. And while my looks and riches are hard to change, less-than perfect cedar is not. One way to deal with damaged wood is simply to cut the damaged part out and join the remaining pieces back together. While I had to do that with a few strips on the bottom of the boat, I've avoided it wherever possible. This is especially important since I'm book-matching the strips. If I cut a chunk out of a strip, there will be a break in the pattern.

So what to do when there is ding or a gouge in a strip? Patch it, of course.

The first set of photos illustrates the process for a fairly serious gouge. The following photos show the results from repairing chip-out from some irregular grain.


The two pictures above show the original damage to the strip. This damage is from a gouge that was in the original board that I cut into strips.

The first step is to trim/whittle the gouge as smooth as possible. On small gouges, this can be done with one or two cuts of the knife.

If necessary, sand the gouge smooth. Yes this is the pad from a random orbital sander, and no, I didn't use the sander on this. It was a used pad with enough grit at the edge to do the sanding.

Mark a piece of similarly grained and colored wood in preparation for fitting into the smoothed gouge. For small gouges, a whittled flake of wood works fine. This being a larger gouge, it required a larger scrap of wood.

Whittle and/or sand the scrap so that it fits into the smoothed gouge. Leave it oversized so it is easier to work with.

Glue the scrap into place and either tape or clamp it.

After the glue dries, plane and/or sand the protruding scrap so that it is flush with the edge of the strip. The strip is ready to go.


The two photos above show the process for a chip-out of irregular grain. Yes, I should have spent more time matching the grain direction. However, the color of the patch piece should darken to match the color of the strip and be virtually undetectable in a few weeks.

There are two pieces of advice I've gotten from the Kayak Building Bulletin Board that I try to keep in mind, especially on this, my first boat: 1) It's a boat. Part of the goal is to make something beautiful, but the main goal is to make a functional watercraft. Time spent on trying to make it absolutely perfect is time that won't be spent on the water. 2) Follow the 10 foot rule. Most people will view the boat from at least 10 feet. If it looks good from 10 feet, stick with it. If not, do something about it.

Tuesday, May 17, 2011

Fixing a Big Gap

I was a little overzealous when trimming the ends of one pair of strips and ended up with a gap of 1/16th of an inch or so. When I fit shavings into it, the grain direction was noticeable, so I decided to make a patch that would match the grain. Here are the steps:

The gap.


I cut small pieces off the end of a strip with matching color. The angle matches the angle where the strips at the gap should meet.


I glued them together so the grain formed a chevron where the two halves of the patch piece meet.


After trimming the patch piece to a size where it fit into the gap, I glued it into place. It stood above the surface of the kayak.


After the glue dried, I sanded the patch flush and the patch is almost invisible.

Filling in Some Gaps

Trimming the ends of the strips where the meet tightly at the keel line is a little, shall I say, challenging. I ended up with small gaps in several places. One way to fix gaps like this is to mix some sawdust with epoxy and use it as a paste. The sawdust/epoxy mixture ends up darker than the original wood, though. So for the larger gaps, I decided to fill them with wood shavings that I made by planing along the edge of a scrap strip. The process is:
  1. Create the shavings by planing the edge of a scrap strip with a color similar to those bordering the gap. Trimming it so it is wedge-shaped in cross section may help to fit it in the gap.
  2. For a wider gap several shavings can be piled together.
  3. Put a little glue on the sides of the shavings.
  4. Wedge the shavings into the gap. Note they will likely stand above the surface of the kayak. This is not a problem.
  5. After the glue has dried, sand or plane the shavings down so they are even with the surface of the boat.
These photos illustrate the process.


The gap between the ends of the strips where they meet at the centerline.


The shavings used to fill the gap


The gap is filled.

Saturday, May 14, 2011

Stripping the Hull

Once I made the correction to the cheater strips, I picked up a lot of speed on stripping the hull. The process for each strip is:
  1. Trim strip to approximate length

  2. Use a block plane to put a rolling bevel on the strip being installed. This simply means beveling the edge of the strip so that it meets the edge of the previous strip flat. The angle of the bevel depends on the curvature of the side of the boat. This, of course, changes along the strip depending where on the boat the edge of the strip is.

  3. Cut the end of the strip to the approximate sharp angle it needs to meet the strip on the opposite side correctly.

  4. Use a block plane to trim the ends of the two corresponding strips so they meet properly at the ends.

  5. Apply a bead of glue to the edge of the strip already on the kayak.

  6. Place the strip into place, stapling it to the forms and tightly taping it to the previous strip.

Anywhere two strips meet, the shaping is done by hand with the block plane. If you trim too far, you end up with a gap. So there's a lot of trim, fit, trim, fit, trim, ...you get the picture. And speaking of getting the picture, here are a few from stripping the hull:


This photo shows the hull stripped just past the chine (the transition from bottom of the boat to the side). The guillemot has a fairly hard chine. Some builders have recommended stripping this portion of the hull using narrower strips to spread the transition at the tight curve. I opted not to do this and it turned out o.k., but if I were to do it again, I would use thinner strips in this area to make fitting the curve easier.


On a couple of the forms at the chine, the strips rose above the form a little. At first I thought that the strips were just following a smooth spline curve and that if I altered the forms by adding a spacer, it would make for a smoother transition at the chine. After a bit of fitting, I discovered that adding the spacer was going to allow the strips to align farther and farther from the form. So, ultimately, I removed the spacers and clamped the strips down to the forms where they were rising up. After a day or two, the strips conformed to the forms with just a staple.

The stern close to where the internal stem ends. This is not a good picture, but if you look close and use your imagination, you can see how the ends of the strips are trimmed in order to meet where they come together.


Looking from the center to the bow as stripping continues. It was about this point in the work when I thought, "I can do this!" You can see a little bit of the concave curve at the bow. Getting that curve correct required some steaming and clamping. Some other builders have failed to get that curve well-defined and attribute difficulty in tracking to the lack of that narrowing at the bow and stern.


Stripping continues. I staple each strip to the forms and use masking tape between the forms to hold the strips tightly together while the glue dries.


Time for the last strips in the hull. Getting them trimmed to fit took a lot of planing and fitting and planing and fitting, but that is the nature of the beast.


The hull is completely stripped! A major milestone.

Next time: mistakes I made on the hull and how I fixed them.

A Drastic Do-Over

When last we left progress on the kayak, I had discussed using cheater strips to allow the strips to go on with less bend and associated stress. This image shows cheaters in place on the bow (note the triangular gap at the point of the cheater strip).


At the stern, I discovered that somehow I had managed to get the spacing of the strips off by about 1/4 inch. So if you looked at the kayak from the end of the bow, a strip on the port side was closer to the keel than the corresponding strip on the starboard. After some close measuring, I found that the cheater strip on the port side was wider than that on the starboard. My choices were 1) to trim the next strip or two on the port side to get the two sides back in line or 2) to take out the cheater, reposition the strips, and then cut and glue in new cheaters. I knew I would be bothered by the mismatch if I didn't go back and line things up. Option 2 it was.

How to remove the cheaters? Well, the wood glue I'm using (Titebond II) is not waterproof. It can be softened with steam. I shielded the strongback and forms with foil to minimize the amount of steam and water that would get on them. I pulled the staples holding the cheaters and adjacent strips. The steam softened the glue. Knife blades, chisels, and wooden wedges provided enough gentle leverage to get the glue to separate. These two images show one of the cheater strips nearly removed (yes, it was a mess).


After the cheaters were out, I peeled off what softened glue I could and trimmed the rest with a sharp chisel.

On the bright side, all this work gave me the idea to get rid of that pesky triangular space that shows up where a cheater tapers out (see the first picture in this post). The solution is to use a hacksaw blade to trim the end of the triangular area so it has a wider, more squared off end. As a result, cheater strips don't have to be tapered impossibly thin at the end. The next three images illustrate this process.


Wednesday, April 20, 2011

Bending Strips

O.K., in my last post I lied about the content of this post, but I think this is the best place for this one.

The strips are flexible, but only to a point. It can be challenging to get them to conform to the forms. When you force them into place, they like to spring back and are often under enough tension to pull a staple out. In addition they often need to be twisted into the proper shape. And if you bend one too far...SNAP!

Ultimately one has to use a combination of reshaping the strip using heat and/or steam as well as holding it in place under tension until it is glued into place.

A lot of builders swear by using a heat gun in order to soften a strip so it can be bent into shape. Once it cools down, it holds the shape. I'm not sure if it is a lack of patience, a lack of skill, or a property of the particular wood I am using, but I didn't have much luck with the heat gun. I found I couldn't get the wood to bend much and that I would get the wood so hot that it would start to burn a little. So I decided to try steam.

I'm lucky enough to have a steam cleaner. This is an appliance that heats water to boiling and keeps it there. When filled it will hold enough water to provide about 15 minutes or so of a constant jet of high pressure steam:


My first step is to clamp the strip flat against a work surface. I cover the end of the work surface with foil to prevent damage from the steam:


Next, I slip a length of PVC with a hole in the middle of it over the portion of the strip that I want to bend. (I found most of the time I wanted to get a twist in the strip to get it to follow the line of the forms.) I put a clamp on the strip outside of the PVC so that I can handle the strip without scalding my hand. I then put the nozzle of the steamer up to the hole and spray the steam in:


It only takes about 20 seconds for the wood to soften to the point where it can be easily twisted and bent. I do this using the clamp and hold it in place until the wood cools back down. Usually a little less than a minute. I have found that there is a little rebound from where I hold it. In other words, I have to bend it a little farther than I want it to end up:


Often, I found that I had over-bent or under bent the strip. This really isn't a problem, since it's easy to resteam and rebend. After a while, I got fairly accurate with it. A couple of times, I ended up having a strip in place but needing to reshape it at the end. In these cases, I used foil to protect the strips already in place and steamed the strip while it was partially on the forms.

Steaming doesn't remove all the challenges. I still found that the twists and bends near the bow and stern were severe and that things needed to be held tightly in place.

In one instance, I bent a strip too much and heard that dreaded snapping sound. It's the only time I have cussed during this entire process. But as I have learned, there are few, if any, mistakes that cannot be fixed. I steamed the strip to get it closer to the desired shape and then glued the pieces back together. If I look hard enough, I can find the break, but I'm probably the only one who can.

Next time, the biggest mistake so far, I promise.
Tuesday, April 19, 2011

Second Strip and Cheaters

I got the first strip on and then...No I didn't die. I am just one of the lamest bloggers in cyberspace.

To cut to the chase, by the end of the warm weather last year, I got the hull stripped and faired (sanded to a smooth shape), but the weather got too cold to do the fiberglass on the hull. Then it got too cold to do much of anything in the garage. I have started on the deck this spring.

Now to pick up the arc of the narrative where I left off...

After the first strip I put on the...wait for it...second strip. The Guillemot has upswept ends, so to take some of the tension out of the strips going on after the first strip, one can leave space between strips at the end and put in relatively triangular pieces called cheaters. And that is exactly what I did.


Above: the 2nd strip at the bow. In order to get the second strip into position I had to do some steaming and bending. In order to get it and the first strip to stay in place, I made small holder clamps from pieces of cedar strips and screwed them to the form.


The amount of space between the two strips was wider than a single strip, so I shaped two pieces to fill the gap. This was done by sawing the fill-in pieces to approximate shape and then planing them for as tight a fit as I could get. Note the gap left in the narrow end of the triangular area. More on this later.


A close-up of the gap.


Once I trimmed the cheater strips to shape and with the correct bevel, I glued them into place. Here it is with staples, tape, and a clamp to keep it in position.


Next time: undoing cheater strips. Yep, I made a mistake.