Wednesday, April 20, 2011

Bending Strips

O.K., in my last post I lied about the content of this post, but I think this is the best place for this one.

The strips are flexible, but only to a point. It can be challenging to get them to conform to the forms. When you force them into place, they like to spring back and are often under enough tension to pull a staple out. In addition they often need to be twisted into the proper shape. And if you bend one too far...SNAP!

Ultimately one has to use a combination of reshaping the strip using heat and/or steam as well as holding it in place under tension until it is glued into place.

A lot of builders swear by using a heat gun in order to soften a strip so it can be bent into shape. Once it cools down, it holds the shape. I'm not sure if it is a lack of patience, a lack of skill, or a property of the particular wood I am using, but I didn't have much luck with the heat gun. I found I couldn't get the wood to bend much and that I would get the wood so hot that it would start to burn a little. So I decided to try steam.

I'm lucky enough to have a steam cleaner. This is an appliance that heats water to boiling and keeps it there. When filled it will hold enough water to provide about 15 minutes or so of a constant jet of high pressure steam:


My first step is to clamp the strip flat against a work surface. I cover the end of the work surface with foil to prevent damage from the steam:


Next, I slip a length of PVC with a hole in the middle of it over the portion of the strip that I want to bend. (I found most of the time I wanted to get a twist in the strip to get it to follow the line of the forms.) I put a clamp on the strip outside of the PVC so that I can handle the strip without scalding my hand. I then put the nozzle of the steamer up to the hole and spray the steam in:


It only takes about 20 seconds for the wood to soften to the point where it can be easily twisted and bent. I do this using the clamp and hold it in place until the wood cools back down. Usually a little less than a minute. I have found that there is a little rebound from where I hold it. In other words, I have to bend it a little farther than I want it to end up:


Often, I found that I had over-bent or under bent the strip. This really isn't a problem, since it's easy to resteam and rebend. After a while, I got fairly accurate with it. A couple of times, I ended up having a strip in place but needing to reshape it at the end. In these cases, I used foil to protect the strips already in place and steamed the strip while it was partially on the forms.

Steaming doesn't remove all the challenges. I still found that the twists and bends near the bow and stern were severe and that things needed to be held tightly in place.

In one instance, I bent a strip too much and heard that dreaded snapping sound. It's the only time I have cussed during this entire process. But as I have learned, there are few, if any, mistakes that cannot be fixed. I steamed the strip to get it closer to the desired shape and then glued the pieces back together. If I look hard enough, I can find the break, but I'm probably the only one who can.

Next time, the biggest mistake so far, I promise.

Tuesday, April 19, 2011

Second Strip and Cheaters

I got the first strip on and then...No I didn't die. I am just one of the lamest bloggers in cyberspace.

To cut to the chase, by the end of the warm weather last year, I got the hull stripped and faired (sanded to a smooth shape), but the weather got too cold to do the fiberglass on the hull. Then it got too cold to do much of anything in the garage. I have started on the deck this spring.

Now to pick up the arc of the narrative where I left off...

After the first strip I put on the...wait for it...second strip. The Guillemot has upswept ends, so to take some of the tension out of the strips going on after the first strip, one can leave space between strips at the end and put in relatively triangular pieces called cheaters. And that is exactly what I did.


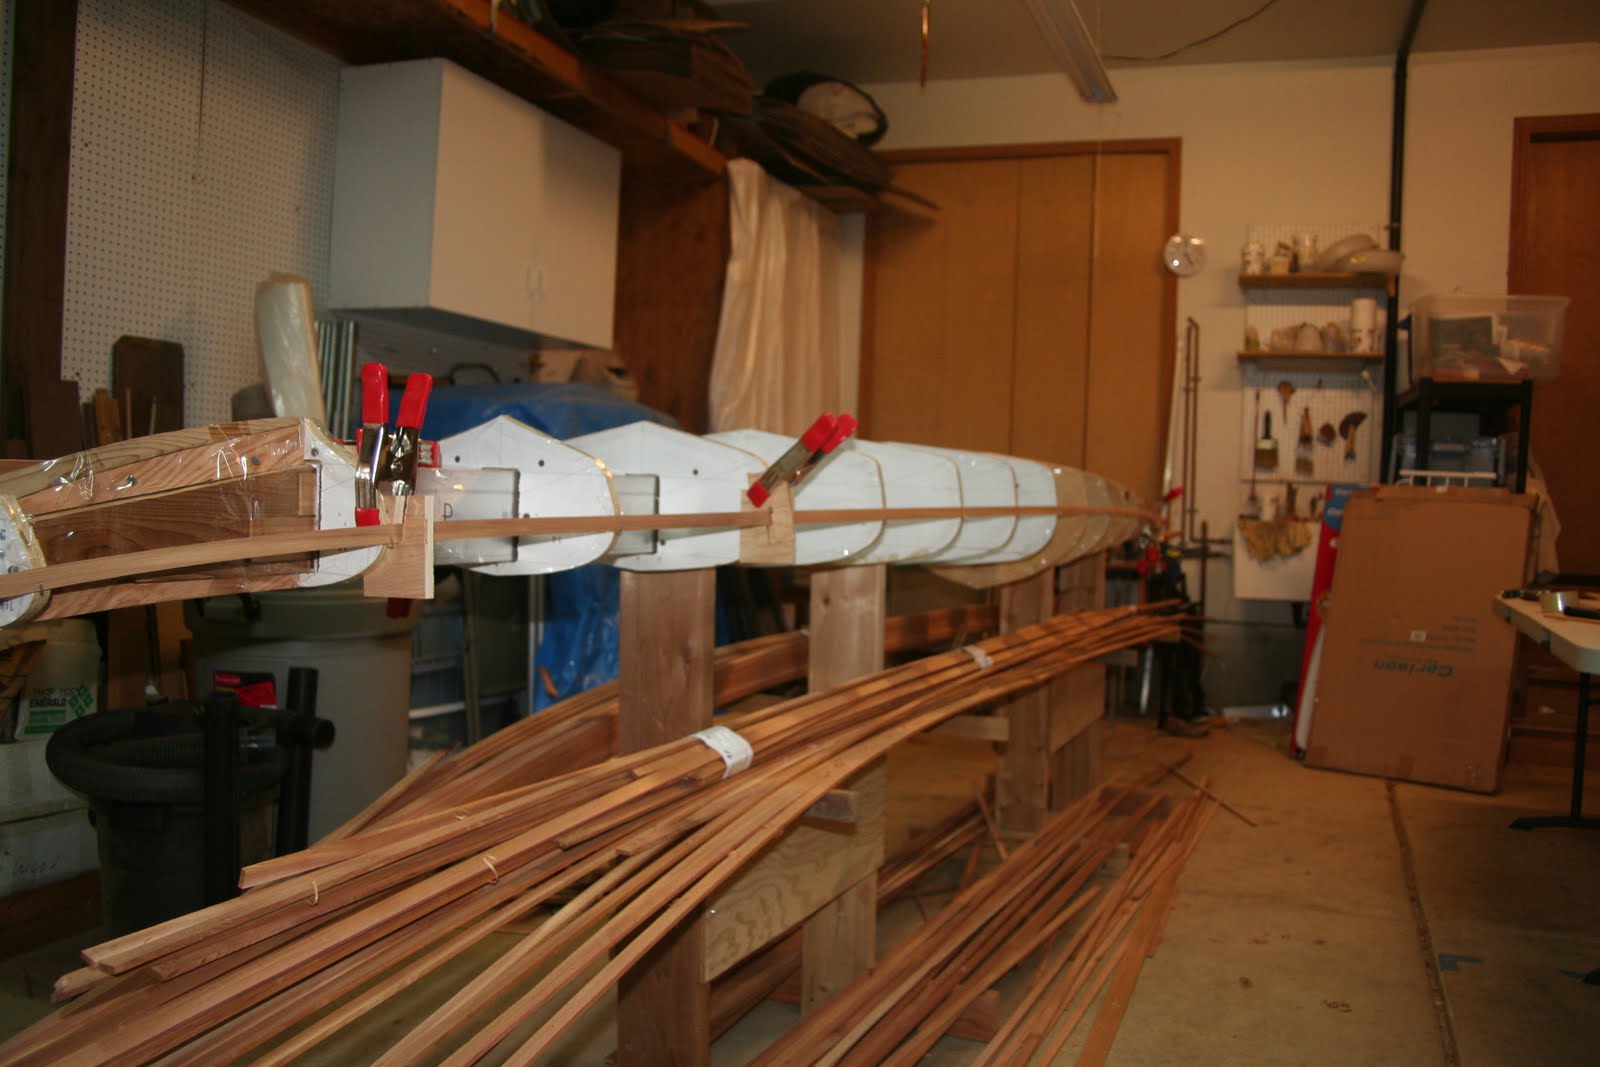
Above: the 2nd strip at the bow. In order to get the second strip into position I had to do some steaming and bending. In order to get it and the first strip to stay in place, I made small holder clamps from pieces of cedar strips and screwed them to the form.


The amount of space between the two strips was wider than a single strip, so I shaped two pieces to fill the gap. This was done by sawing the fill-in pieces to approximate shape and then planing them for as tight a fit as I could get. Note the gap left in the narrow end of the triangular area. More on this later.


A close-up of the gap.


Once I trimmed the cheater strips to shape and with the correct bevel, I glued them into place. Here it is with staples, tape, and a clamp to keep it in position.


Next time: undoing cheater strips. Yep, I made a mistake.

Thursday, May 27, 2010

First Strip Installed

After all the difficulties with the forms...after the trials and tribulations of getting wood cut...after all the worry about what mistakes are left to make...after making sure I got the book-matched strips in order...

I installed the first strip!!!!

The first strip

I started by doing a bevel that approximately matches 1/2 of what is required where the deck meets the hull. Then, using clamps and plywood holders I positioned the strip, eye-balled it for fairness, then started stapling.

Another view

This was actually much easier than I thought it might be.

I expected bending the strip along the shear line to be more challenging than it was. I hit the strip with a heat gun while pulling/pushing it into the required shape. After a few minutes, it started bending easier. With clamps, plywood holders, and staples it behaved reasonably well. Some of the staples don't want to hold, so I'm hoping to get some additional strips on soon.


Bend at the bow


For those wondering and who have not read my other posts:


  • Guillemot - plans purchased from Guillemot Kayaks

  • Book matched western red cedar - I found a great board at a local home improvement store. One of the advantages of living in the Pacific Northwest.

  • Internal strongback - I'll probably use an external strongback on my next boat.

  • Staples - it's my first boat, I didn't want to bite off more than I could chew.

  • Rolling bevel - I've started fitting the second strip on each side and finding this easier than I thought it would be.

  • Internal and external stems.

  • Titebond II.

Wednesday, May 26, 2010

A Practice Project

Pilot the Dog

This 50 pound bundle of mischief joined the clan in November. One of his hobbies is chewing up any telephone, remote control, or game controller left unattended. Since this is my first strip-built anything, I decided I should try a small project first. I settled on a box we can hang on the wall in our TV room that keeps the remotes handy yet still out of Pilot's reach.

Wall box under construction

Building this box gave me some practice stapling strips, beveling the strips to go around the curve, and gluing strips together. The box is now constructed and is awaiting final sanding and a coat of varnish. The most important lesson I learned is that it is easy to get carried away with the plane when beveling the edge of a strip. Something I don't want to do on the boat!.

The Final Cut and Milling Flat Edges

Cutting the double-wide strips lengthwise proved to be an easy task. I used a couple of feather boards to hold the strip down and another to hold it against the saw fence. I probably spent about a minute on each strip.

.

Router set-up for milling flat edges

Once the strips were to their final width of 3/4", I needed to get the edges flat and smooth. So I set my router up as a joiner. I made an auxiliary fence from a piece of MDF. I routed a 1/64" groove on the infeed side and set a straight cut bit flush with the outfeed side. Each strip went through one time for each side. As shown in the photo, I used feather boards to hold the strip tight against the fence and tight against the router table. The corners of the edges ended up so sharp that I actually cut my thumb a time or two.

Sunday, May 02, 2010

$22 Worth of Cedar

Late last fall, I discovered that Jerry's Home Improvement carried cedar landscape boards. These are basically very, very low grade 2x12 boards suitable for raised beds. I also discovered that in the stack of rotten, loose-knot boards, there were a few that might be considered tight-knot. I bought a 10-footer as a test and put it in my garage. A few weeks ago, I discovered they had lengths up to 20 feet. So I took a gamble and spent $22 on an 18 footer in hopes that I would get something I could at least get a few strips out of for the shear strips.

After an hour or so going through the stack of boards, I was able to extract what appeared to be a hidden gem. I loaded the soaking thing on top of my car and carefully drove home with it.

In trying to cut the 10 footer, I discovered I was a little out of my depth with the table saw and decided I would need someone with more experience and a better saw to do the cutting. Last night one of my neighbors, who just happens to be a woodworker/carpenter, told me to tote the board over to his house. I carried the strips home about an hour and a half later. I don't think I could be happier about how they turned out. There is very little waste and the color is beautiful.

These strips are 1/4 inch thick and just over 1 1/2 inches wide. To use them for the kayak I'll have to cut them into 3/4 inch wide strips and run the edges across my router table set up as a jointer.


Close-up of boards.


Closer close-up of boards.

Sunday, April 11, 2010

Aligning the Forms

The plane of each form need to be square to the strongback and aligned with all the other forms. Getting the forms aligned was an extremely interactive process and it took me forever to get a system together that I felt confident in. If I had to do again, it would probably take me only a matter of hours instead of the days it took me.

The first thing I did was to get the strongback level by using shims under the legs of the stands. That way, I could insure that if a form was vertical, it was square to the strongback and aligned vertically with all the other forms.

The next thing I did was to clamp a small frame to the end of the strongback and use a plumb bob to line up a nylon line vertically with the centerline on the strongback, as show in this picture. I used a dab of hot glue to hold the nylon line in place on the frame.


As I mentioned, the holes in the forms were oversized, so I needed a way to position each one so that it lined up vertically and horizontally with the other forms and also to tilt it one way or the other. The method I ended up using involved clamps and a piece of angle aluminum. That way I could raise one or both sides of the form and slide it left or right as I needed. I marked a center on the angle aluminum so that I could line the center of the form up with the center line on the strongback.


I used the nylon line to visually line each form with the others. In this photo, I have a clamp holding the nylon line at the top of the the centerline of the form I'm adjusting. I visually line up the nylon line with the centerlines of all the forms. If it does not align, I move the form I'm working on until it does. Once the form is aligned I secure it to its cleats with hot glue.


Once I had a form aligned I checked to make sure it was vertical and that it was square with the box beam. If it needed a little adjustment, I used shims of posterboard (i.e. little chunks of cereal boxes) to get the alignment spot on. Once there, I secured it in place with a couple of clamps and hit it with several spots of hot glue.

Once all the forms were secured with hot glue, I checked the alignment with the string and also by visually aligning the the other marks on the forms. Most of them were aligned perfectly, but for a couple, I had to break loose the hot glue and realign them.

Once all forms on the strongback were properly positioned, I secured them in place with drywall screws.


The end forms were much easier than I had expected. I glued the perpendicular forms to the larger form that is parallel to the centerline, using clamps to hold them in place. When they were dry I used small pieces of angle aluminum to secure the larger ones. I then took the whole assembly, lined it up with the rest of the forms using string and eyesight, clamped them in place, secured them with hot glue, then used sheetrock screws to shore them up.

this photo shows the strongback with all forms aligned, secured, and taped on the edges so that when I glue strips into place they won't stck to the kayak.


Getting the forms aligned and secured was a large pain in the butt. Some of the lessons I learned were:

  • Be patient. You will get it done even if you have to backtrack and redo and backtrack and redo. There is no point in beating yourself up over your mistakes. Let it be fun.

  • Hot glue is your friend. It holds things in place, but can be undone. You can knock parts loose with a mallet, cut it with a chisel, or cook it with a heat gun until it melts again and softens.

  • Aquarium tubing with water in it does not make a precise enough level. I tried this at first, but the tubing could move up or down by about a quarter of an inch before the water would move. Had I used this to line up the forms, the kayak would be messed up.

  • A nylon line, even stretched tight, will sag. I used a stretched line to draw a horizontal line on the side of the strongback. When I checked this by measuring, I could tell it had sagged in the middle. I rotated the strongback so that the side was on top. When I stretched the line again, it confirmed that the line had sagged.

  • Buying an aluminum box beam saves time. In my case, lots of time.

  • When you get the forms aligned and secured, you realize that you really are going to be able to build your kayak. And that is a good feeling.

Kayak Build: Strongback 2.0


_MG_0873
Originally uploaded by TimsPottery
The weather got cooler, and school began, so work on the kayak stopped for the winter. Now the sun is beginning to shine, and I'm ready to get back to the boat. I ended last year's work with the forms on a new strongback. This post will describe what went into that. I urge you to learn from my mistakes...I mean insights.

Before you go any further, you should check out the videos in Nick's blog at http://www.guillemotkayaks.com.

After deciding that the first strongback was not constructed well enough, I decided to go ahead with a single length of 2x4 extruded aluminimum box beam. I bought this at a local metal supply place. I cut it to the length of the untapered part of the strongback as outlined in the kayak plans. For the tapered ends of the strongback, I trimmed 2x4 sections of wood from 2x6's and trimmed them to fit into the ends of the aluminum box beam. I inserted them about 8 inches into the boxy beam. The wooden parts were narrower than the inside dimension of the box beam, so I secured them with wedges on either side.

Once I had the ends in, I used a nylon line to trace a straight line down the strongback. About every foot, I used a dab of hot glue to hold the line in place so that I could more easily draw the line. If you do this, be careful not to nudge the line to the side as you put the glue down.

In his videos, Nick does the cutouts in the center of the form so they just fit over the aluminum strongback. By the time I got the strongback built, I had already cut holes too large for this method. An additional issue (probably not too hard to deal with on future boats) is that my aluminum beam has a slight bit of torsion, so forms would have to be adjusted to line up.

Since the form holes were oversized and the beam had torsion, I decided to use cleats to anchor the forms. For every form, I drilled 2 holes in the side of the beam and in the top of the beam. I then tapped the holes. To anchor the cleats to the beam I used machine screws. Yes, this was a bit of work, but it was not as bad as I thought it would be.

The photo shows one end of the strongback. The tapered portion is wedged is held tight in the box beam by wedges (after the forms were all on, I secured the tapered insert with screws through the box beam and into the wood). At the top of the end of the box beam is a small horizontal cleat. on the side of the box beam are two tapped holes waiting for the vertical cleat. I predrilled holes into the cleats and made sure they were square with the beam so that the forms could go on them. Each cleat was attached after the previous form was slipped onto the strongback.

Tuesday, September 22, 2009

Google Maps Suggests a Paddling Trip

Someone on the Kayak Building Bulletin Board pointed out that if you get driving directions from Google Maps to go from somewhere in the U.S. to somewhere in Japan, the site will gladly provide those directions. Directions from Eugene, OR to Osaka, for example produces directions which include the following:

2. Kayak across the Pacific Ocean Entering Hawaii 2,756 mi
26. Kayak across the Pacific Ocean Entering Japan 3,879 mi

As these are driving directions, I would assume the best strategy is to rent a car on the land portions of the journey rather than taking the car along on the paddling legs of the trip.

Monday, September 21, 2009

Sand Lake, Oregon

Sand Lake is, coincidentally enough, located in Sand Lake State Park, just off the Three Capes Loop, about a 15 minute trip north of Pacific City.

The put-in is just over the bridge (if you can call it a bridge) as you go into the park. Kim and I arrived about an hour after what should have been high tide. Most of the lake (estuary, really) bottom was exposed and a slight current was going towards the ocean. After paddling in a channel for a couple hundred feet, we had to walk our boats for the next couple hundred feet. We were able to paddle about 50 feet until the water was again too shallow. Kim towed her boat through the shallow water and muck and got to water deep enough to float. I walked out to assess the situation, and as we talked, the direction of the flow changed.
Off we went, paddling through mostly shallow water towards the mouth of the estuary. A few times, we bottomed out and had to back paddle and pick a deeper route. The strong current and deepening water left no doubt about the incoming tide. We paddled to the gap in the dune where the estuary exchanges with the open ocean, beached our kayaks, and took a quick walk out to the beach.
It was a gorgeous day -- calm, sunny, with a temperature in the seventies. After our look-see on the beach, we got back in our kayaks and rode the incoming tidal flow back to the put in point. The water in the lake was completely calm for the whole paddle. By the time we got back to the put-in (about an hour after we started), what had been exposed land was covered with enough water to float our kayaks.
During our trip we saw egrets, blue heron, and a couple of flounders.
I would classify this paddle as easy as long as there is sufficient water in the lake. I would be wary about paddling it on the outgoing tide, as the current could be strong and one could conceivably be carried out to the open ocean.
Paddle on.

Thursday, September 17, 2009

Dory Landing at Cape Kiwanda


We spent most of last week at our favorite place on the Oregon Coast, Pacific City. The fishing fleet in Pacific City is comprised of dories, vessels that are small by fishing boat standards. We were lucky to see a few of them come in from fishing. This video illustrates why they have flat bottoms.

Once the boat is on the beach, the operator backs a tilt trailer up to the front of the dory and then lurches it under the front of the boat. A winch gets the boat the rest of the way onto the trailer.

Wednesday, September 16, 2009

Cody

If you knew Cody, you wouldn't call him bright, brave, or very trainable. But you'd love him.

Cody was always up for an adventure, be it a walk around the block, a hike up a mountain, or a moving trip across the country. Whatever it was, it was a joy. And whatever he encountered -- as long as it wasn't something as scary as a mailbox that had been knocked over or as dangerous as the UPS man -- was to be explored until the next scent or movement caught his attention. In most of the pictures we have of him, he's looking away from the camera, his doggie attention deficit disorder preventing him from focusing on whomever held the camera. In those pictures, as in life, his mouth was usually open in the curious, disarming smile.

He was always thrilled to meet another dog and more than happy to be playful and submissive. With new people, he was shy at first, but then warmed up. When Kim went to the vet's to pick him up after he got neutered, she found him playing with the assistants. Talk about not holding a grudge!

Squirrels and a float on the water were the only things that could hold his attention. He could stare up a tree for a quarter hour after the squirrel was long gone. He would cry for you to throw the float, even if he was bordering on exhaustion -- and he was always sure to bring it back.

We got Cody as a puppy 13 1/2 years ago. He was in a kennel with 6 or 7 siblings. He was the one that didn't rush to the kennel gate. Kim said that was the one she wanted, and that was the one we took home.

A little over two years ago, Cody was diagnosed with cancer on his foot, in his spleen, and in his liver. The good doctors at the Oregon State Vet Hospital excised the mass on his foot, removed his spleen, and took out one lobe of his liver. They gave him chemo treatments as followup. The prognosis was a year at most. Last year about this time, another large tumor showed up in his liver. He was given another chemo treatment and nearly died of scepticemia. But he pulled through again. The dog who was afraid of a broken mailbox proved himself to be tough enough to surprise us all.

After the first cancer diagnosis, he went through quite a few health crises, and with each one we prepared to face the loss we knew would come sooner rather than later. But every time he rallied back to smile and wag at the prospect of a new adventure.

I could go on about the all the things Cody did -- stealing bagels and English muffins on the counter, etc., etc. -- but none of that would really get at why he was so special. So I'll just sum it up by saying that everyone who knew him recognized that he was a special dog who saw the world as good and made them see the world the same way.

Two weeks ago, he hit another health crisis and we knew it would be a matter of days. With the help of our vet, he managed one last rally and made it on vacation to the beach one last time. Before the end of the vacation, though, we knew he was at the end of his last rally. Monday our vet made a house call. He greeted her with a smile and a wag before settling down and going to sleep for the final time.

Wednesday, August 26, 2009

Strongback 1.0 and 1.1

Alternate title for this post: Why You should Strive to Make Every Step of the Process as Perfect as Possible

The fact that I'm using version numbers should be a not-so-subtle hint that things didn't go very well. I decided to do a box beam as described in The Stripbuilt Sea Kayak. So I got myself a sheet of plywood, ripped it into appropriately-sized boards, and then used the table saw to make the rabbets for the glued joints.

The mistakes I made were on version 1.0:
  1. Rabbets were not cleanly cut. I should have checked these more closely and sawed them a second time on the areas that didn't get cut cleanly.
  2. Due to some measuring mistakes, I ended up having to build it out of shorter pieces in a couple of areas. This may have made it less stable with shorter overlaps of the boards making up the sides.
  3. I used screws as well as glue to hold it together. The screws raised the plywood a little where they went in.
  4. I didn't put any internal cross pieces in to keep it from torquing.
I knew it wasn't perfect, but I thought I'd be able to get the forms adjusted on it. Wrong. The holes in the forms were not large enough to allow for the amount of adjustment I needed. So, I enlarged them a bit and rounded the corners of the box beam and belt sanded the areas that were most obviously too high, giving me strongback 1.1.

To make a long story short, after much work trying to get the forms aligned on the strongback, I was not having very good luck. I came to the humbling conclusion that my first attempt was too sloppy and that I needed to work on Strongback 2.0, which I will discuss in a future post.

Monday, August 24, 2009

Why build a sea kayak?

Ultimately, I have to blame my friend Steve. Some years ago he suggested a multiday kayak trip in the San Juan Islands. Despite the crowded coves, the power boaters who cursed us to our faces, the million ton ferry that used its air horn to encourage us to get the $#%* out of the way, and the LSD-crazed locals who nearly set the campground ablaze, I found the trip enjoyable.

The self-contained nature of the boat and the self-reliance required to move the boat across the ocean gave gave me a feeling I've only had backpacking or rock-climbing -- only more so. Since that time, my wife and I have bought recreational kayaks suitable for lakes, bays, and slow rivers, and we've managed to go on a couple of ocean day trips in rented boats. The more I've kayaked and the more I've learned, the more I have felt inclined to kayak.

Inclinations led to web searches which led me to Nick Schades excellent Guillemot Kayaks site. The voice in my head (which has served me well throughout life) said "What could be more self-reliant than paddling around in a kayak you built yourself?" After a year of drooling over these beautiful wooden boats, I ordered Nick Schade's first book The Strip Built Kayak. Finally my wife said, "Why don't you go ahead and build one?" The fact that my wife would suggest I undertake such a garage-crowding, sawdust generating activity shows that either (a) I married an encouraging, understanding woman, or (b) she just likes it better when I'm out in the garage. I firmly believe (a), but either way, I'm building a kayak now. The model I settled on is the Guillemot.

So, I ordered plans and set out on a kayak building adventure. And, an adventure it is, fraught with fits and starts. It is forcing me to learn new skills, to learn how to be patient with myself, and giving me the opportunity to buy lots of new tools. What could be better?

Sunday, August 23, 2009

Back from the Dead?

An update:

Sadly, pottery as a career did not work out. While I garnered many a positive comment on my pottery, I sold almost none. I gave it a try as a career and have moved on.

I spent last fall and winter teaching part time at Lane Community College and doing a little part time programming work for The Conservation Biology Institute. Career-wise I am aiming to do ecological modeling. Towards that end, I am in the midst of a master's degree in Biology at the University of Oregon. I've been lucky enough to be part of a modeling project looking at the ecological effects of climate, human effects, and fire in the Willamette Valley. I am concentrating on the fire modeling piece of that project. This fall (just about a month from now), I will be sitting in classes with a bunch of 18 to 22 year olds. The adventure continues...

Wednesday, February 27, 2008

Red Breasted Sapsucker


_MG_0201.JPG
Originally uploaded by TimsPottery
Or at least that's what I think this is. He's stopped in on our tree a couple of times now, and today I was able snap a few pictures.

Louise


IMG_0601.JPG
Originally uploaded by TimsPottery
Louise hopped into our lives a few days after Christmas a short eight years ago. You don't think of rabbits as having much of a personality, but she would have changed your mind. She approached the cats to try to get them to play. She loved it when it was time to go back into her cage and she could lead you around the house. And she never feared the dogs.

The evening before last she didn't eat her supper. She also didn't eat overnight or in the morning. Kim and I were able to get some food mixed with water into her, but she took a turn for the worse, becoming lethargic by early afternoon. We took her to the emergency vet, where she passed on her own. It was sudden and it was a shock. And we miss her.

Saturday, February 09, 2008

Weed Like a Man!

I hate weeds. I hate weeding. And I don't care for chemical weed killers. What's the solution? A blowtorch, or course. Or by another name The Red Dragon Propane Weed Burner

I opted for the bottom of the line model, with a mere 500,000 btu capcity. I just couldn't justify the Jet Torch kit. From the above linked website:

If you want something more like a flame thrower for hard to reach areas or heavy brush, check out our Jet Torches. Jet Torches require a vapor withdrawal cylinder (we recommend no less than a 100lb. cylinder)..

In the photo, I am laying waste to the weeds growing along our sidewalk. You may notice that there is absolutely no lawn in the background. Two and a half years ago, our front lawn was so overtaken by perennial morning glories (aka cinch weed) that we decided to cover the whole thing with landscaping cloth and mulch. Last year we put in a few trees and gardens.

But, this being Oregon, with wet and mild winters, the weeds started growing anywhere they could. In the past I've tried both boiling water and steam from a steam cleaner on the weeds, but those methods were too time consuming. So today, I decided it was time weed like a man!

The results are promising, with the above ground portions of the weeds singed and wilted. I'm sure some of the larger and robust of the weeds will resprout, but when they do, I will be there, ready to once again weed like a man!

Should you decide to weed like a man yourself, be sure to heed the warnings included with the instructions. Among these warnings:

Avoid desirable lawn and garden plants as the torch does not distinguish between desirable and undesirable growth.

Do not apply flame to cyliders to check for leaks or to increase gas pressure

My Year of Pottery

Somehow, a year has passed since I left my job at NASDAQ and decided to strike out on my own as a potter and writer. I have concentrated on the pottery for most of that year. The hope has been that I can generate enough income working half to 3/4 time at pottery so that I wouldn't have to make money off the writing. I'll just say that so far I haven't reached that income goal.

But what I have done is conceived of and refined a unique product line and placed them into a few coastal galleries. The product line, as you can see, is hanging jellyfish sculptures. I've come up with 3 basic varieties: indoor sculptures, wind chimes, and hanging lamps.

The bell is simply a hand-thrown pot with a shaped edge. The tentacles for indoor sculptures and lamps are extruded, and hand-shaped clay. The wind chime tentacles are hand-shaped, brushed aluminum rods. The tentacles hang from wire hooks inside the jellyfish bell. The tentacles can be removed from the hooks for shipping. Believe it or not, finding the best way to hang the tentacles took me over a year. I finally hit on the hook idea and worked it out in October of last year, several days before I did my first show.

For those interested, the clay body I'm using is Laguna Cone 5 Bmix. The white glaze is Laguna Colonial White. I put either Laguna Royal Blue or Blackberry over the white for color accents. If you'd like to see more, you can check my website The Haystack Studio.

Sunday, August 19, 2007

Of Flying Pigs and Culture Wars in Cake

We made our annual pilgrimage to the Lane County Fair yesterday. Our overall impression is that the fair is shrinking. The art entries really seem to be down. For example, a few years ago, quilts lined the exhibition hall walls two or three high, this year, though, they were only one high. This year, they charged an entry fee, and that may have something to do with it, but even in years past, the number of submissions seemed to be declining. The horse barn had many more vacant stalls and the carnival area on the parking lot seemed smaller, too.


Flying Pigs
Originally uploaded by TimsPottery
But what has been sacrificed in quantity has been supplanted by quality. Of course, I’m talking about the pig races. Every two hours, they run two heats of four young pigs, with the top two finishers in those heats going into the final heat. As with most things in life the buildup lasts much longer than the excitement. The M.C. talks up the crowd, picks volunteers to open the racing gates, record the winners, and lead cheering sections. Each race is over in an instant (after all, how long could it take for four pigs to run 50 feet in order to get to bowls of food). For an added challenge, the M.C adds jumps are to the track. And as the photo shows, the young porkers manage to become airborne.


Bible Cake I
Originally uploaded by TimsPottery
The second contest we followed was unofficial, and not quite as lighthearted. This was the culture wars as reflected by the entries in decorated cakes. One of the first place finishers in the Adult category depicted Jesus floating in the clouds along with a biblical quote. I saw no entry in this category from the other side.


Flying Jesus
Originally uploaded by TimsPottery


Bible Cake II
Originally uploaded by TimsPottery
In the Adolescent category, though, both sides were well represented. On the right was the Fishers of Men entry. This entrant had the same last name as the entrant with the floating Jesus.


Death Takes a Wife
Originally uploaded by TimsPottery
On the left was the Death’s Wedding cake. Both of these adolescent entries won a first prize.


The Happy Couple
Originally uploaded by TimsPottery


So what conclusion can we draw from all this? That the right has won the cake culture wars among adults, but that the battle still rages among our batter-pouring, icing-dying youth? Maybe so, maybe not. One thing is certain, though: the culture wars will continue even when pigs fly.