Sunday, June 19, 2011

Holding Down Bent Strips

I decided not to use staples on the deck of the boat. This means that strips have to be held into place with something else when they are glued into place. I'm using a dab of hot glue where the strips meet the forms. Hot glue isn't as strong as a staple, so in difficult situations other means are necessary.

The ends of the Guillemot are upswept. This means the strips that go out to the ends have to bend up and stay bent up while they are glued into place and afterwards. The first step to getting them into shape is to steam them and bend them. After that, they need to be held firmly into place so they don't lose their shape. Simple clamps are not strong enough, or easy enough to put into place to do this. So, another way is needed: the temporary screw-in clamp.

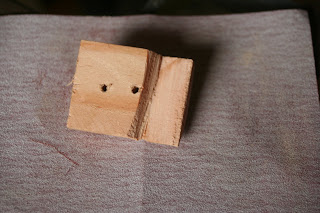
A notch is cut into a small piece of scrap wood:


The wood clamp is placed where needed, a hole is drilled, and a screw holds it into place:

In the example above and below, a small wedge of cedar was used to tighten the strip in place.


View of two of these clamps from the upswept stern end of the kayak. The very end is held in place with masking tape.

Fixing the Sheer Strip for the Deck

The sheer runs along the full length of the kayak at the widest part of the kayak. It is where the hull meets the deck and where the two halves of the kayak are joined together after the hull and deck are completed.

On the deck, I'm using a half inch tiger maple for the sheer strip. The strip is off a 10 foot board, so I had to attach two strips end to end. I attempted to do this with a butt joint, i.e. two flat ends glued together. The joint didn't hold and I ended up with a gap:


My choices were either to pull the sheer strip off the boat or to repair it in place. Repair it in place it was. I decided to cut out about a foot long portion of the sheer. I cut it at an angle to do a scarf joint. To insure that the scarf on the patch strip would match that on the patch strip, I taped them together before cutting. I also used a thin sheet of steel with a thin piece of wood taped to make sure I didn't saw through to the hull. This shows the set-up after I made the cut through the sheer strip and the patch strip:


I cut the patch strip a little longer than it needed to be and then sanded the end to shorten it. I was careful to make sure the scarf angle stayed the same. Here it is just before gluing. Note the tape on the hull to make sure the glue from the patch didn't glue the deck sheer strip to the hull:


Sunday, June 05, 2011

Fairing and Sanding the Hull

After stripping the hull, it was time to fair (make the surface regular) and sand. In concept its pretty simple -- make the hull shaped like it is supposed to be shaped, and make it smooth. In practice, its not rocket science either.

The steps:
  1. Use a cabinet scraper to scrape all the glue blotches off.
  2. Use a plane and a cabinet scraper to pare down the prominent ridges where strips meet. (be careful, planing can be mesmerizing and you don't want to go through the hull!)
  3. Use a fairing board, which is nothing more than sandpaper glued onto a plywood board with handles, to fair the surface.
  4. Use sandpaper wrapped around spongy foam to fair and smooth concave areas.
  5. Wet out and sand smooth again. This is the time to search for glue spots that escaped the fairing and sanding so that they don't make an ugly appearance when it is too late to do anything about it (i.e. after epoxy and fiberglass).
One big lesson I learned on this is to use good sandpaper. I used cheap sandpaper for most of the fairing and it took me two or three times as long as it would have with the good stuff.

For the sanding, I used a random orbital sander. This power tool is now one of my best friends. I got one that I could hook a vacuum to and it reduced the dust by about 95%.

BE SURE TO WEAR A DUST MASK!

A few photos to show off my astounding work:

This is the fairing board I made. The handles are angled on purpose, as I find my wrists get sore if I use handles that are vertical. The board is the size of 1/2 sheet of sandpaper, which can be glued on with spray adhesive. Ideally, the fairing board will flex so that it rounds the shape of the boat. I will use thinner plywood next time so that the board flexes.

Looking at the hull from the stern. One half is wetted out to raise the grain, the other half isn't. Can you guess which is which? I thought you could. (In case you couldn't, the right side is wetted out.)


Most of the hull viewed from the bow. The book matching shows up really well here. The board I used for strips had more sapwood (light) at one end and more heartwood (dark) at the other. I laid the strips so that the bow would be lighter and the stern darker. That shows up a little in this picture. I'm hoping it is apparent when the boat is complete.


Detail of the bow. If you look close, you can see that not only did I book match the strips centered around the keel line (see photos above) but also between pairs of strips on one side. The effect is subtle, but I hope it is apparent when the boat is finished.